
How to create dynamic FAQ accordions using Webflow’s CMS
In this guide, you'll learn how to create dynamic and easily updatable FAQ sections using CMS collections, enabling you to make quick adjustments from a single centralized location.

.png)
Managing FAQ sections on your website can take time, especially when information changes frequently. However, with the power of Webflow's CMS, you can transform your FAQ management process into a breeze.
In this guide, we'll show you how to create dynamic and easily updatable FAQ sections using CMS collections, enabling you to make quick adjustments from a single centralized location. Say goodbye to the hassle of manual updates and hello to a more streamlined approach to web design.
Here’s how you do it.
Step 1: Create your FAQ collection
In Designer view in Webflow, click on the CMS icon on the left panel and then click the Create New Collection icon at the top of the slide-out panel (it’s small and has a + on the icon).
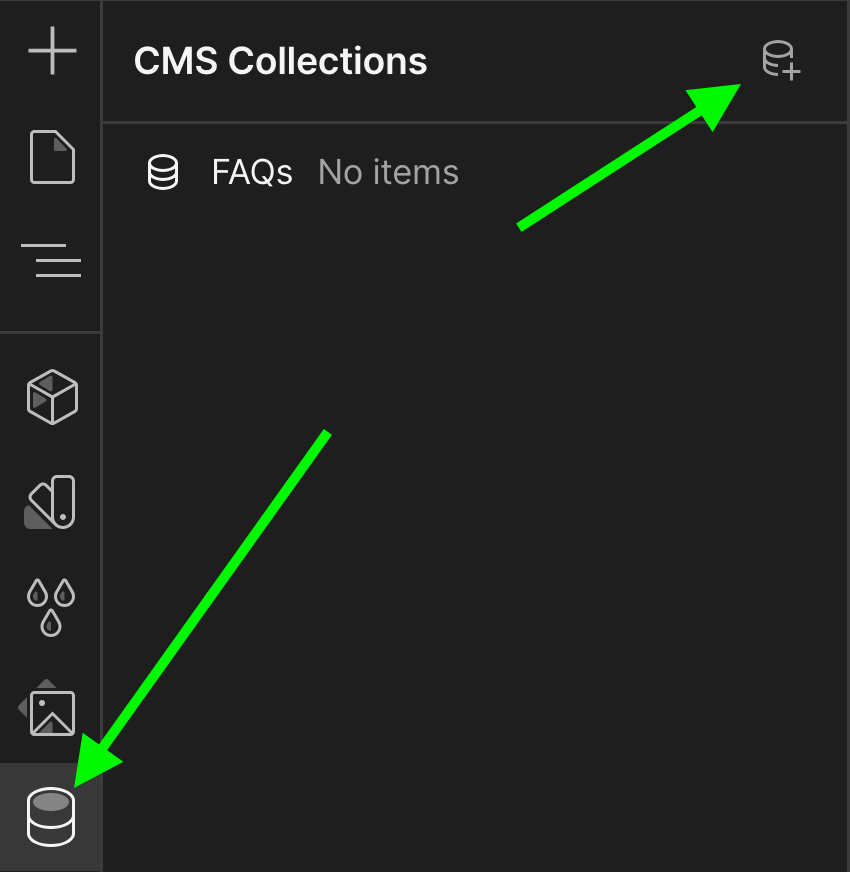
Give the collection a name (FAQs works). Under Basic Info, name the first title Question so that you know where to type in the question.
Then click + Add Field to add a custom field called Answer. This will be where the answer goes and we’ll make it a rich text element so that it allows links and images if need be.
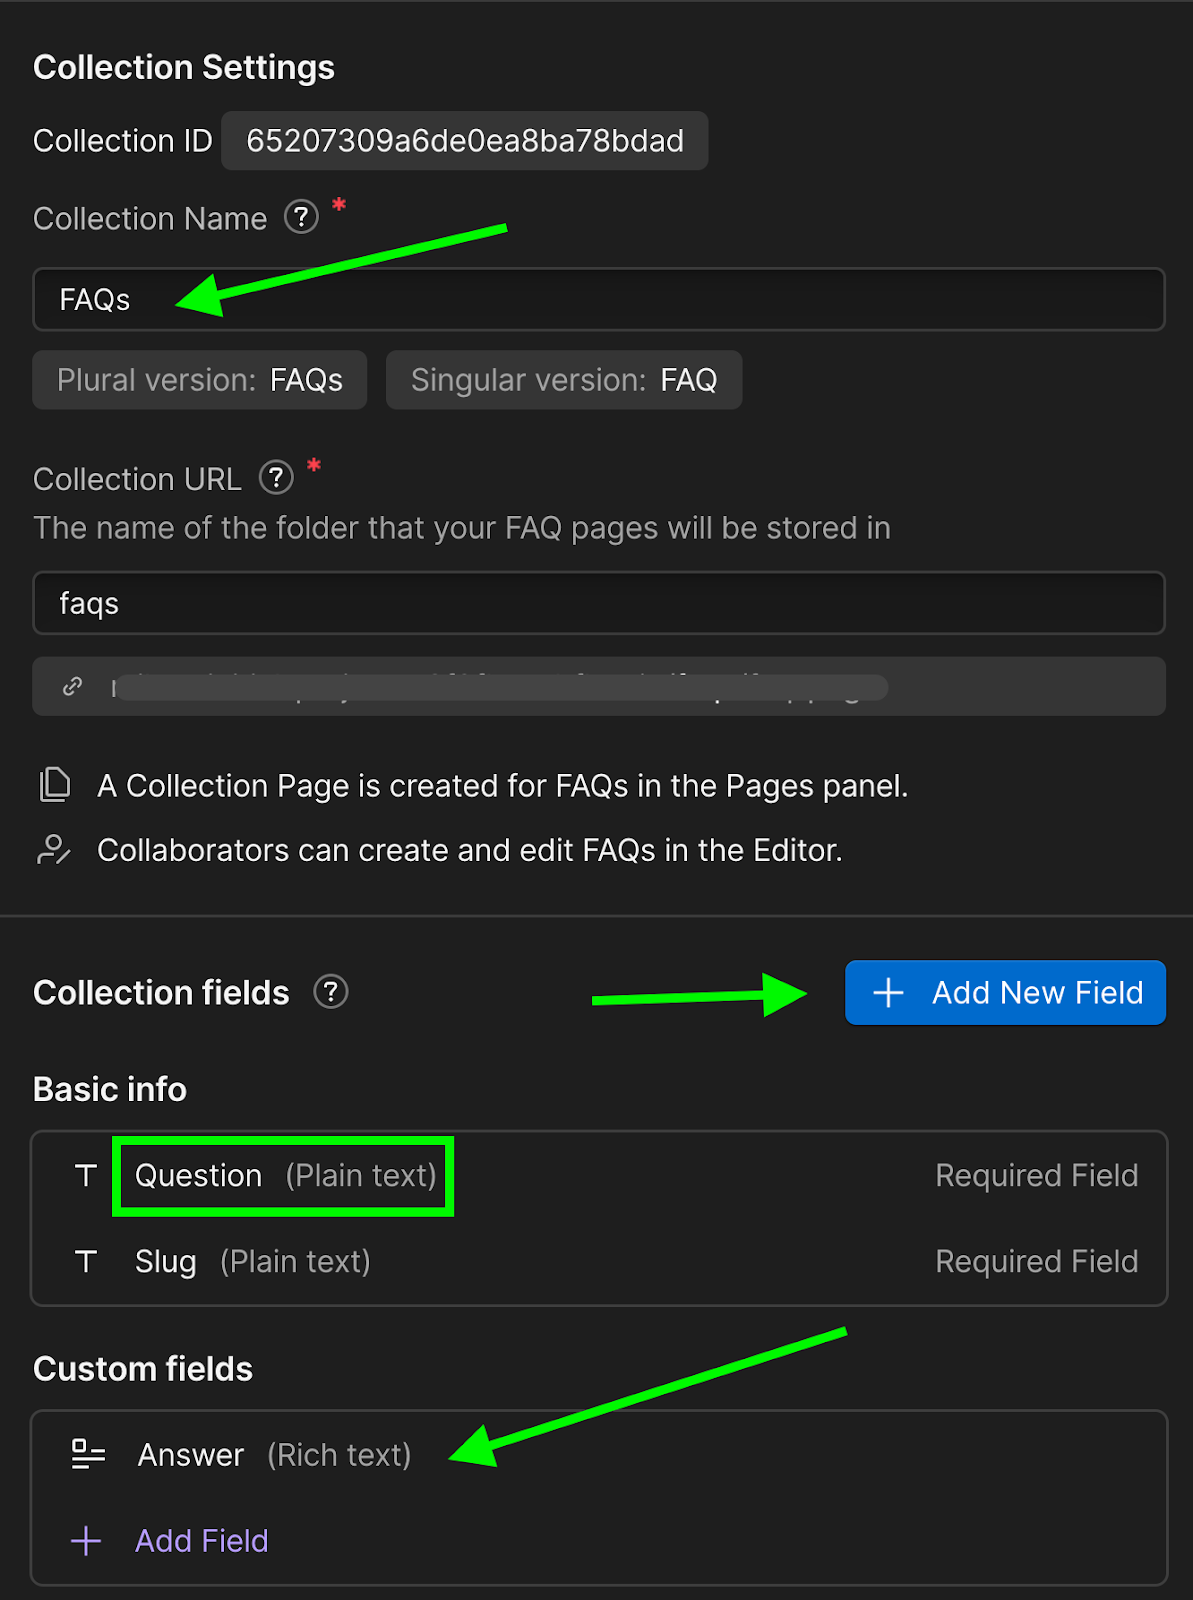
You can make this CMS collection as simple or as complex as you like. Whatever suits your needs best.
At this point, if you don’t have your FAQs written out just yet, Webflow will ask you if you’d like to add sample items. You can use these as placeholders.
Now that we have some content, let’s get it onto a page.
Step 2: Create the FAQ page
If you don’t have an FAQ page in your project, click on the Pages icon at the left panel and then Create New Page at the top of the slide-out panel.
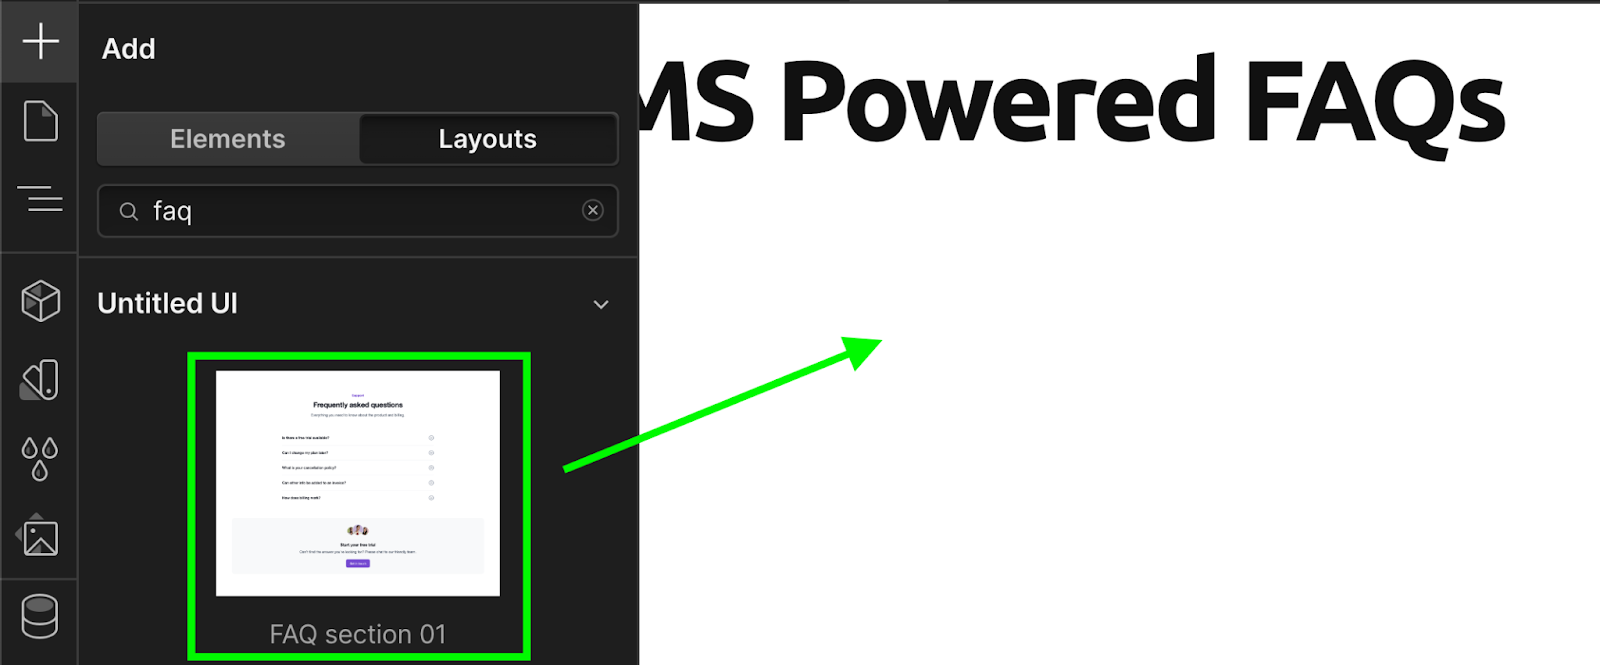
On your new FAQ page, click on the + Add Elements icon on the left panel and select Layouts.
NOTE: For this tutorial, we’ll be using the Untitled UI layout library. To download this free layout library, type “untitled” in the Layout search bar and then “browse more libraries on Marketplace.” Scroll down to find Untitled UI Library in the list and click on it. It will let you install it free of charge. Return to your FAQs page by going back to your Webflow dashboard and clicking on your project.
Under the + Add Elements slide out panel, select Layouts and type “faq” in the Layouts search bar. Drag the element called “FAQ section 01” under Untitled UI onto your page.
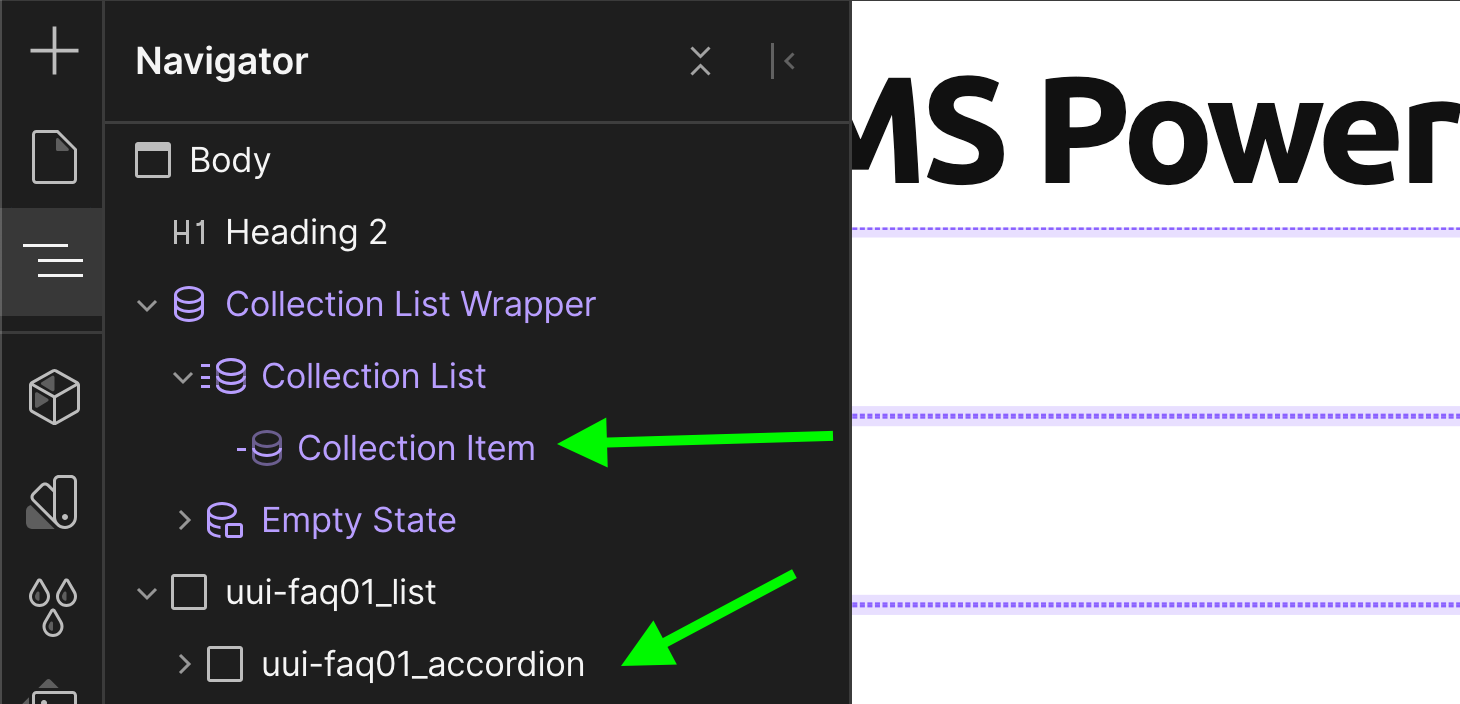
We don’t need everything that comes with this FAQ layout, only the FAQ list styles so click on the Navigator icon at the left panel and drill down into the FAQ items until you find one titled “uui-faq01_list” nested in the “uui-faq01_component.”

Drag the “uui-faq01_list” up to the top of your page, beneath your heading, and delete everything else.
You should see a clickable accordion style FAQ section with several generic questions.
Step 3: Connect the CMS and the FAQ
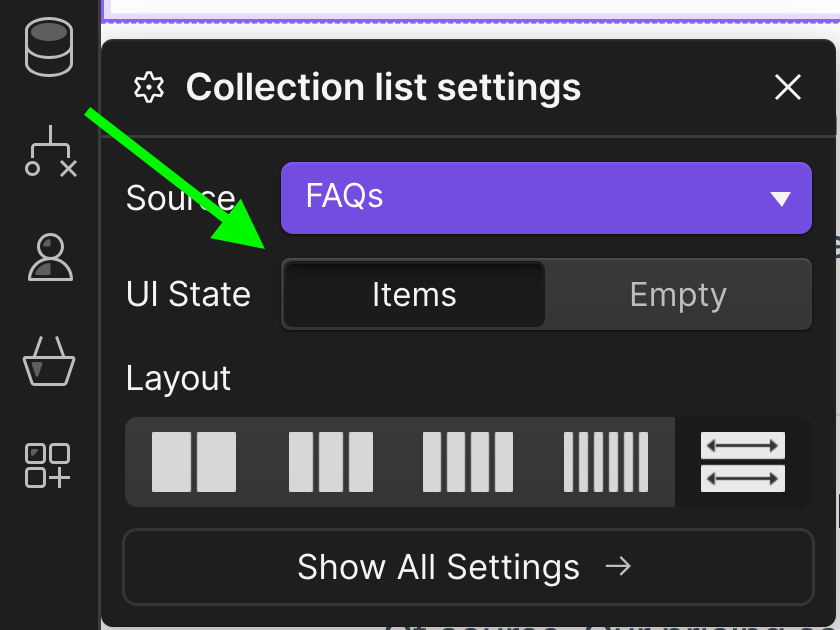
Click on the + Add Elements icon on the left panel again and this time select Elements. Scroll down to “Collection List” under CMS and drag it up onto your page beneath your heading.

Your Collection List Settings should pop up automatically.
Select the collection source in the dropdown (we named ours FAQs), make sure Items is selected in the UI State, and leave Full Width as the default layout. We’ll be adding styles to the layout later.
Now to add content.
Click on the Navigator icon again and select the first accordion item in the template list. It will be called “uui-faq01_accordion.” Copy this item by pressing Command C on Mac or Ctrl C on PC. Then click on the Collection Item element nested in your Collection List above it and paste it there by pressing Command V on Mac or Ctrl V on PC.
While you still have the Navigator up, click on the element called “uui-faq01_list” and look to the right-side Style panel. Copy the Style selector for this element called “uui-faq01_list.” We’ll be adding this to our Collection List.
To do this, click on your Collection List in Navigator and paste the class into the empty Style selector field on the right. You can also type it in and Webflow will find the class for you.

Step 4: Add content from your CMS
Minimize the Navigator panel by clicking the Navigator icon again. Now click on the first FAQ heading on your page, then click on the cog icon to pull up Inner Text Settings.

Check “Get text from FAQs” and select “Question” from the dropdown menu to add the content from your collection. You’ll see that it will dynamically update all of your headings in your list.
We can’t update the generic answer text beneath it just yet because it isn’t a rich text element like what we have in our CMS collection. To add a rich text element, click on the generic answer so that it’s highlighted, then click on + Add Elements icon. Scroll down and find Rich Text beneath Typography and click it. A large Rich Text Block should appear beneath the generic answer text.
If you don’t see Inner Text Settings pop up automatically, click on the cog icon next to Rich Text Block like we did above, check “Get text from FAQs,” and select “Answer.”
Give this Rich Text Block the same style as the generic text style above it by adding “uui-text-size-medium” in the Style selector on the right-side panel.
Finally, delete the generic text beneath each heading and you’ve got your dynamic, CMS-powered FAQ section that you can drop onto multiple pages and update from the CMS.
Need Webflow Support?
Incorporating Webflow's CMS collection for FAQ sections streamlines updates and offers dynamic content management. Try implementing this method and see how it can help you be more efficient with your designs.
If you have any questions or need further assistance, let us know! We offer unlimited Webflow design and development at a flat monthly rate for B2B and SaaS companies.
.webp)
Unlimited Webflow Design & Development
